User-Agent Access Control
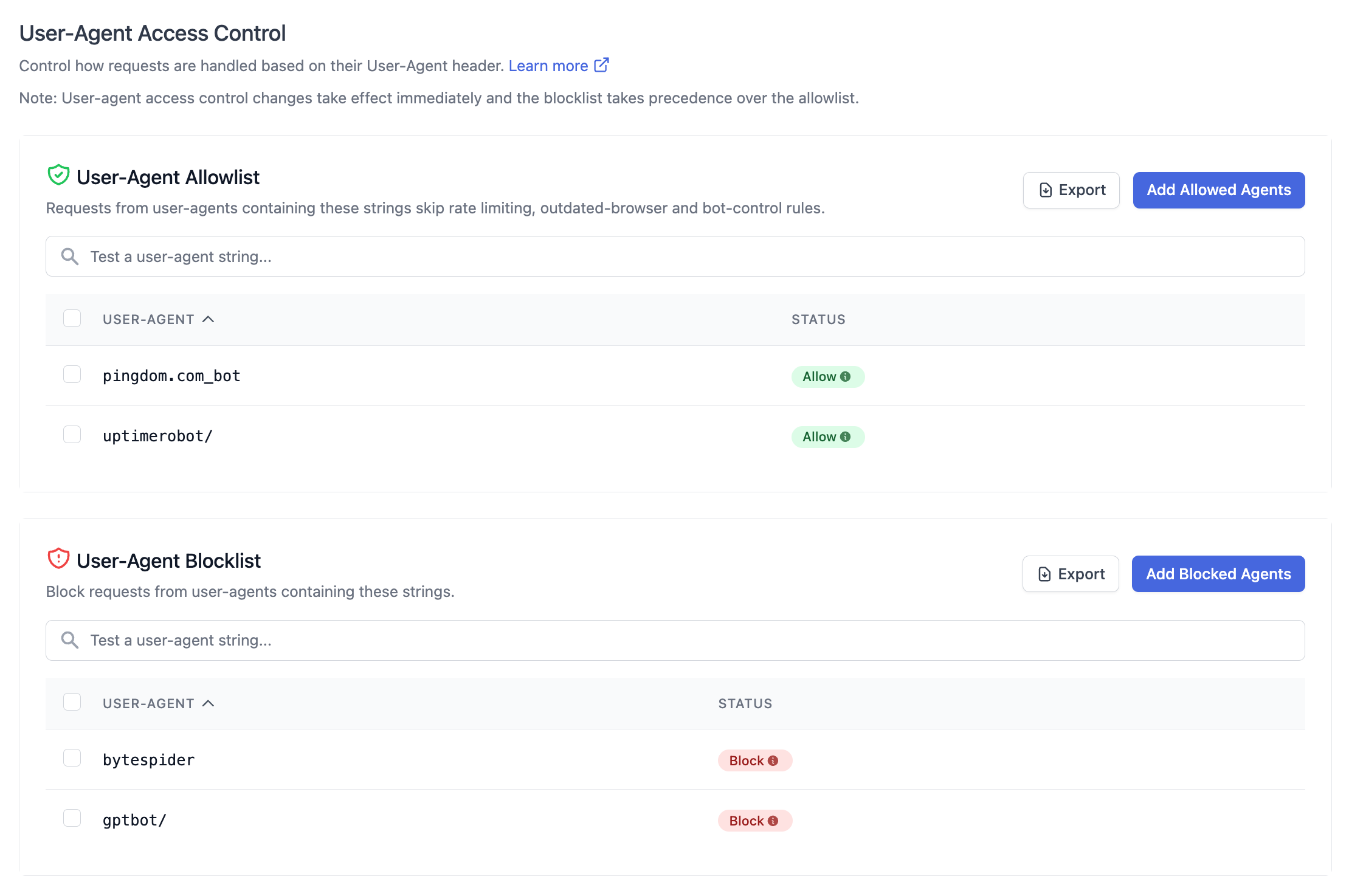
The User-Agent Access Control feature allows administrators to manage how requests
are handled based on the user-agent header they send. It complements the default Web
Application Firewall (WAF) protections with two lists:
- Blocklist: block unwanted clients, such as crawlers, scrapers, or AI bots, from reaching your application.
- Allowlist: let trusted clients, such as uptime monitors or partner integrations, skip rate limits and bot protections that would otherwise slow them down or block them.
For more information on the WAF and default protections, see the Firewall documentation. To manage access at the IP address level instead, see IP Access Control.
Feature Overview
- Match traffic whose
user-agentheader contains a string you specify. - Manage both lists from the Altis Dashboard, with no code or configuration changes required.
- Changes take effect immediately.
This feature is accessible from the Altis Dashboard under User-Agent Access Control, and is designed for simple, effective control over automated traffic.
How Matching Works
Each entry in either list is a plain text string. Every incoming request is inspected and compared against your entries.
- Substring match. An entry matches if it appears anywhere within the
user-agentheader. For example, the entrybytespidermatches the user agentMozilla/5.0 (compatible; Bytespider; ...). - Case-insensitive. The casing of your entry does not matter:
BadBot,badbot, andBADBOTall behave identically. (Entries are stored and shown in lower case.) - Any match applies. A request is matched by a list if its user agent matches any one of that list’s entries.
Blocklist
If a request’s user-agent header matches an entry in the blocklist, the request is
rejected at the CDN/WAF edge with an HTTP 403 Forbidden response and never reaches your
application.
Common use cases include:
- Blocking AI training and scraping bots (e.g.
GPTBot,Bytespider,ClaudeBot). - Blocking poorly-behaved crawlers that ignore
robots.txtor generate excessive load. - Blocking scripted clients and tools you don’t want accessing the site.
Note: Avoid entries that appear in ordinary browser user agents, such as
Mozilla,Chrome,SafariorAppleWebKit. Because entries match anywhere in the header, these would block every visitor using that browser.
See Best Practices for choosing entries.
Allowlist
If a request’s user-agent header matches an entry in the allowlist, the request skips:
- The CDN-level and login page rate limits,
including the stricter limits on
wp-login.phpandxmlrpc.php. - The outdated-browser restrictions. These are off by default and only enabled on request. When enabled, they check page requests from user agents claiming an old browser version (roughly more than a year old), which is a common sign of automated traffic, and can count, challenge or block them.
- Traffic Management bot rules.
Allowlisted requests are still checked by the blocklist, the IP blocklist, and the managed exploit protections. Only traffic controls are bypassed, not security controls. They are also still subject to the per-container rate limits on each application container, and to the Node.js request rate limit on Node.js applications.
Common use cases include:
- Uptime and performance monitors that would otherwise trip rate limits.
- Partner or internal integrations that send a distinctive
user-agent. - Legacy clients that are caught by the outdated-browser restrictions.
Warning: The
user-agentheader is set by the client and can easily be faked. Anyone who copies an allowlisted string into their own requests will skip the same protections. Where the client has a fixed set of IP addresses, use the IP Access Control allowlist instead, which cannot be spoofed.
See Best Practices for choosing entries.
Precedence
The blocklist takes precedence over the allowlist. A request that matches both lists is blocked.
An entry can’t be added if it overlaps an entry on the other list in a way that would stop the
allowlist entry from working. For example, bot can’t be added to the blocklist while uptimebot/
is on the allowlist, because every request matching uptimebot/ also matches bot and would be
blocked. The same check stops uptimebot/ being added to the allowlist while bot is on the
blocklist, and stops the same string being added to both lists. To change a conflicting entry,
remove it from the other list first.
The reverse is allowed: a blocklist entry such as badbot/1.0 can sit alongside an allowlist entry
such as bot, because requests matching bot but not badbot/1.0 are still allowlisted.
Limits
- Each entry can be at most 200 characters.
- Entries are escaped before being stored, which adds a character for each special
character (such as
.,(,)or-). An escaped entry must be at most 200 characters. - Each list holds roughly 2,000 characters of escaped entries in total. The dashboard shows an error when a change would exceed this.
Adding an Entry
- Navigate to the User-Agent Access Control section in the Altis Dashboard.
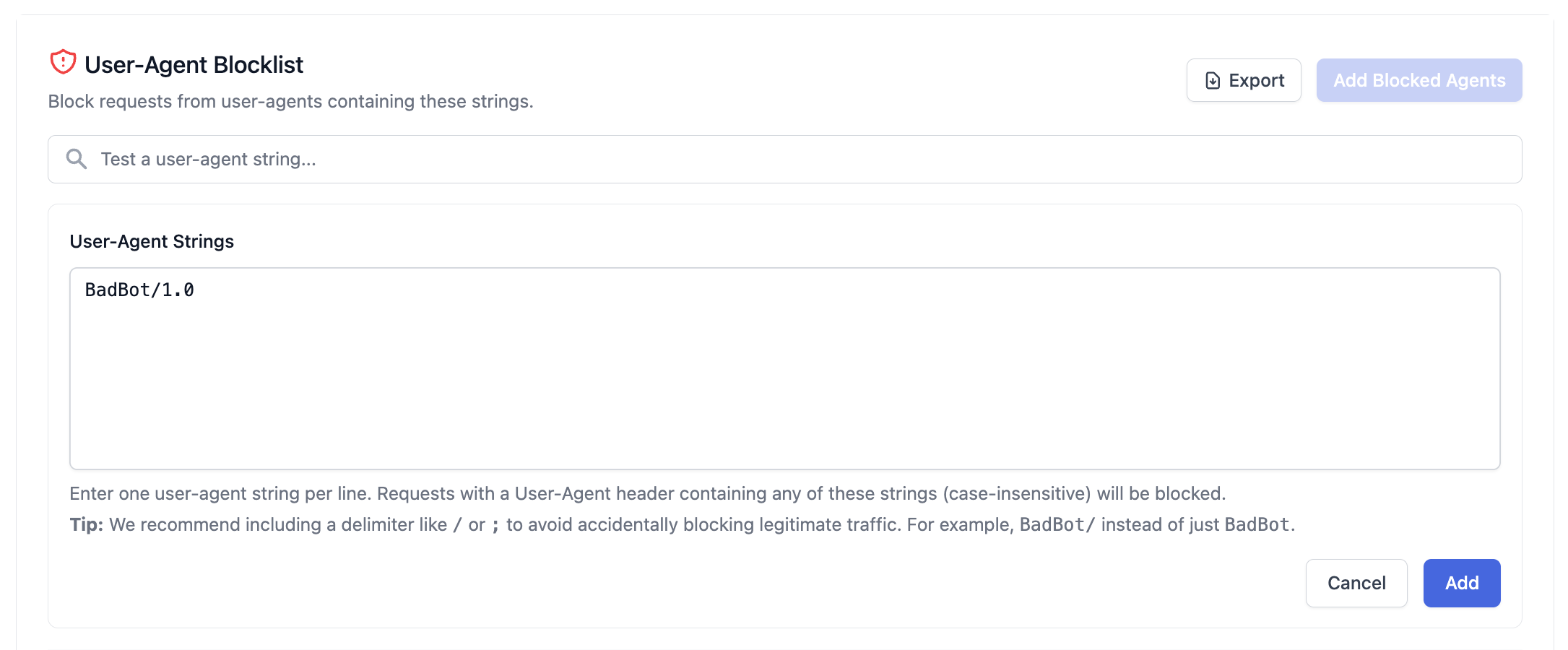
- Click Add Allowed Agents or Add Blocked Agents on the list you want to change.
- In the User-Agent Strings box, enter one
user-agentstring per line. - Click Add.
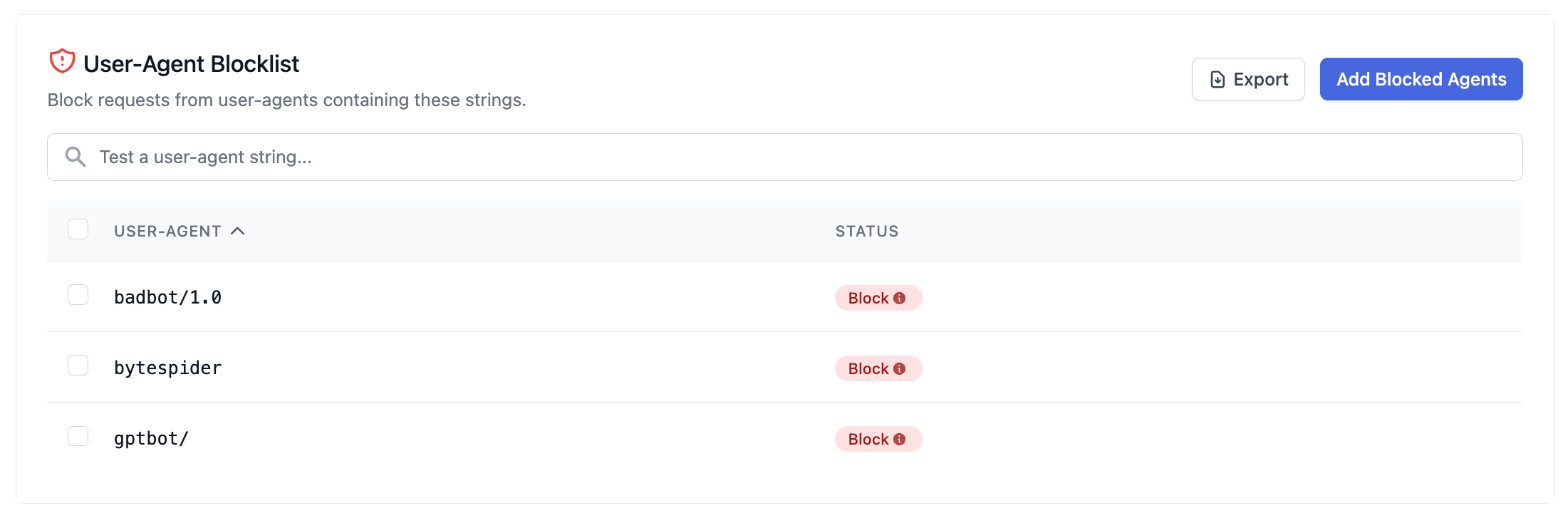
The new entries appear in the list with an Allow or Block status.
Testing an Entry
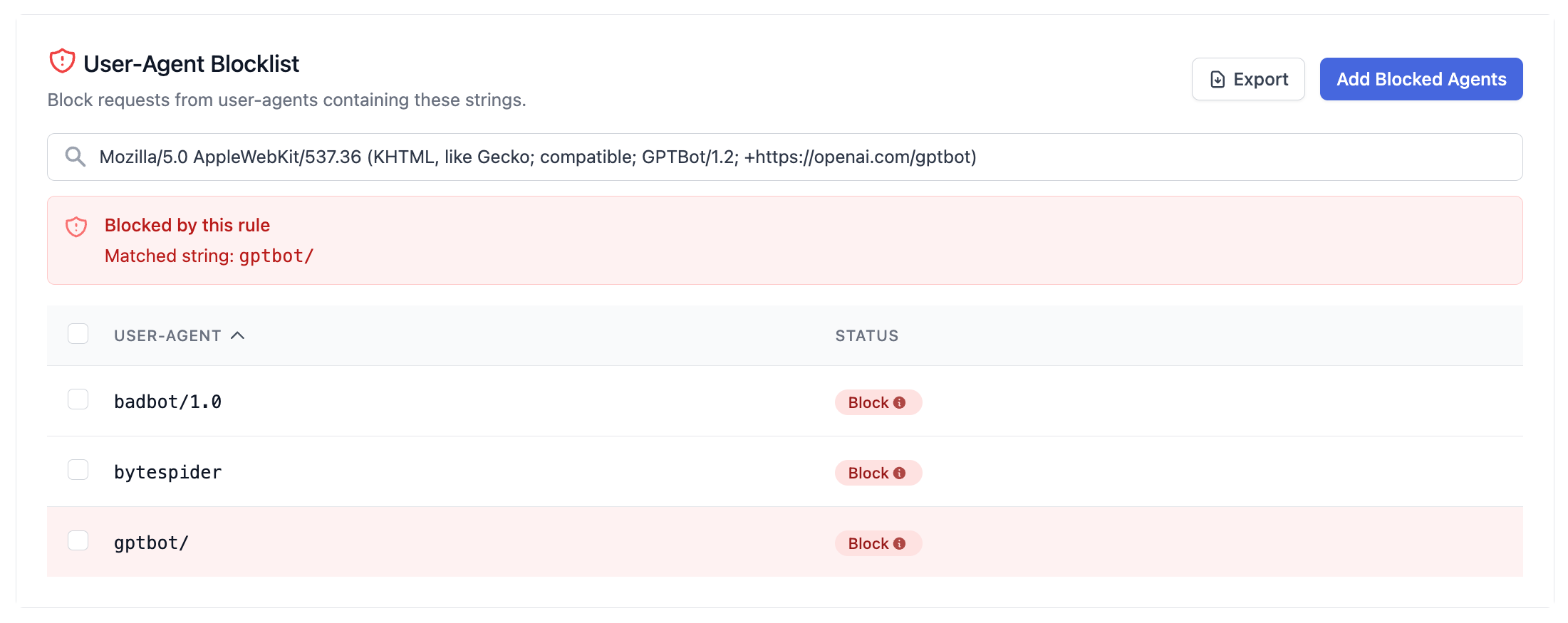
Use the Test a user-agent string… box at the top of each list to check whether a given
user agent matches your current entries. Paste a full user-agent value to confirm that the
list matches the clients you intend, and does not match ones you don’t, before relying on it.
When testing the allowlist, a user agent that also matches a blocklist entry is shown as blocked, because the blocklist takes precedence.
Removing an Entry
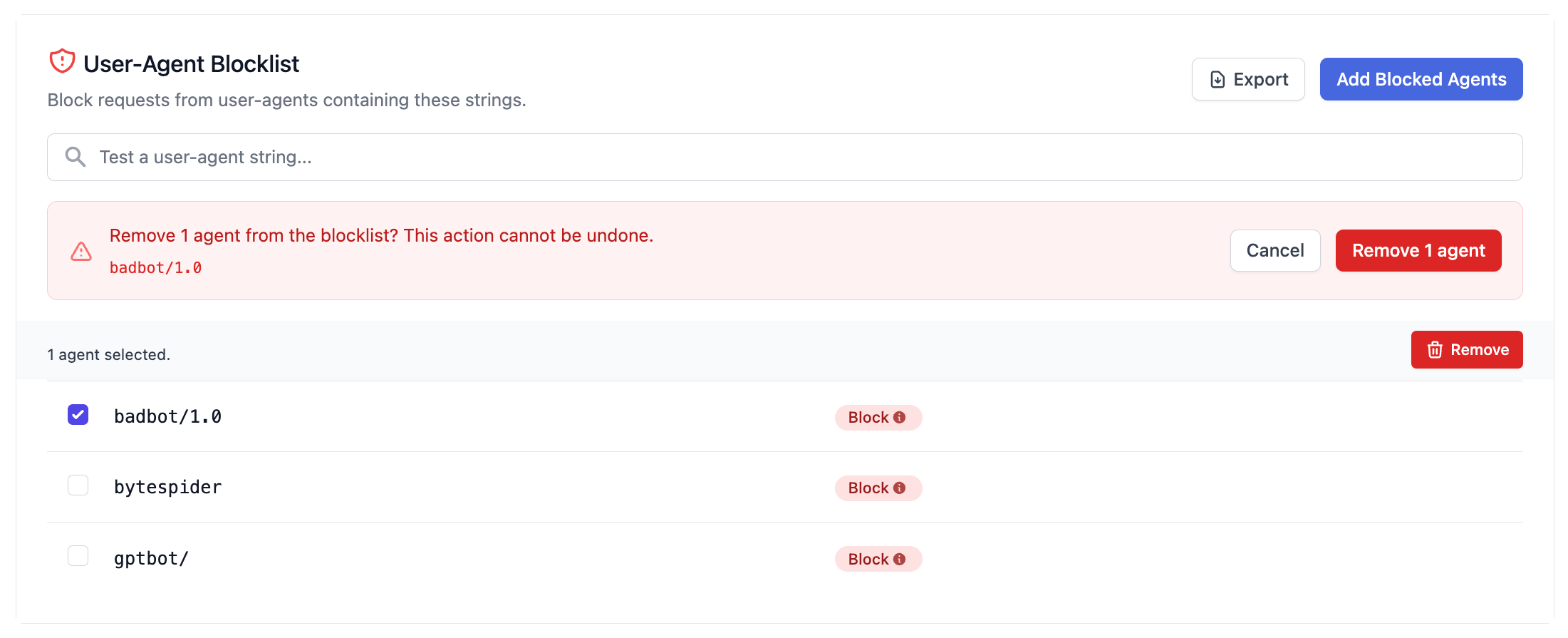
- In the list, tick the checkbox next to each entry you want to remove.
- Click Remove in the bar that appears above the list.
- Review the confirmation banner and click Remove N agent to confirm.
Note: Removing an entry cannot be undone. If you remove one by mistake, add it again using the steps above.
Exporting a List
Click Export on a list to download its entries as a text file, with one entry per line.
Best Practices
-
Use the shortest distinctive part of the user agent. Entries match anywhere in the header, so the full string is rarely needed, and short entries leave room for more within the limits. For example, instead of
Mozilla/5.0 (Windows NT 10.0; Win64; x64) AppleWebKit/537.36 (KHTML, like Gecko) badbot-scanner 1.0add only
badbot-scanner. -
Add a delimiter to short or common tokens. Prefer
BadBot/orBadBot;over a bareBadBotto reduce the chance of matching unrelated traffic. Entries can’t end in a space, as surrounding whitespace is removed. -
Test before you rely on an entry. Use the test box to verify an entry matches the clients you intend and nothing else.
-
Be specific, especially in the allowlist. A distinctive substring (e.g.
bytespider) is safer than a short, common one. A broad allowlist entry such asMozillawould exempt almost all traffic from rate limits and bot protection. -
Keep the allowlist short. Review it regularly and remove clients you no longer need to exempt.
If a legitimate user reports being blocked, remove or narrow the responsible blocklist entry. If you’re unsure which entry is responsible, contact Altis support.